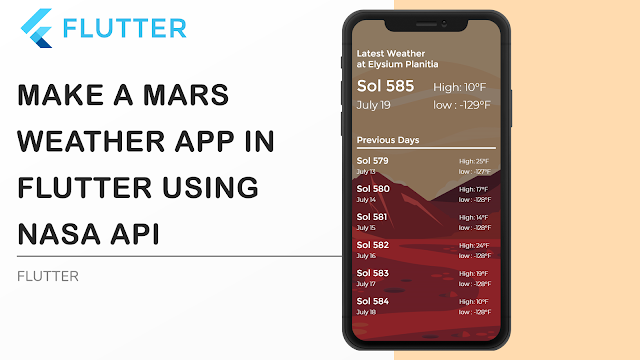
In this tutorial, I will show you how to build a cool Mars Weather App using Flutter and the NASA API. it's a very cool project that will make you understand some advanced concepts in programming, like an HTTP request, API, asynchronous programming. without further ado let's start building the project
Setup the project
first you'ill need to create a new directory Called Assets and add this image inside it
don't forget to add the directory inside the pubspec.yaml file and add the HTTP package also
just copy and paste this code inside the dependencies
dependencies:
  flutter:
    sdk: flutter
    http: ^0.12.0
now let's build the app
source code:
import 'package:flutter/cupertino.dart';
import 'package:flutter/material.dart';
import 'package:http/http.dart' as http;
import 'dart:async';
import 'dart:convert';
void main() => runApp(MaterialApp(
debugShowCheckedModeBanner: false,
home: NasaApp(),
));
class NasaApp extends StatefulWidget {
@override
_NasaAppState createState() => _NasaAppState();
}
class _NasaAppState extends State<NasaApp> {
//Now let's quickly create the list item widget
//this will make it easier to implement or to modifiate
// for the parameters
// Sol is the day number in mars
// min is for the lowest temperature
// max is for the highest
//our list item is similar to the header so we will just copy it
Widget ListItem(String Sol, int min, int max){
return Column(
children: <Widget>[
SizedBox(height:10.0),
Row(
children: <Widget>[
Expanded(
child: Text(
"Sol $Sol",
style: TextStyle(
color: Colors.white,
fontSize: 24.0,
fontWeight: FontWeight.bold,
),
),
),
SizedBox(width: 120,),
Expanded(
child: Text(
"High: $max°C",
textAlign: TextAlign.start,
style: TextStyle(
color: Colors.white,
fontSize: 20.0,
fontWeight: FontWeight.w400,
),
),
),
],
),
SizedBox(height: 10.0,),
Row(
children: <Widget>[
Expanded(
child: Text(
"",
style: TextStyle(
color: Colors.white,
fontSize: 8.0,
fontWeight: FontWeight.bold,
),
),
),
SizedBox(width: 120,),
Expanded(
child: Text(
"Low: $min°C",
textAlign: TextAlign.start,
style: TextStyle(
color: Colors.white,
fontSize: 20.0,
fontWeight: FontWeight.w400,
),
),
),
],
),
SizedBox(height: 10.0,),
Container(
height: 2.0,
width: double.infinity,
color: Colors.white,
)
],
);
}
//Now let's create the HTTP request to get our data
//first let's import some packages
//Now w'ill need to get the API URL
//you can find it in the NASA API web site or you can find the link down bellow in the decription
//if you have an account you can replace the DEMO_kEY by your ow key to get more requests
String Url = "https://api.nasa.gov/insight_weather/?api_key=DEMO_KEY&feedtype=json&ver=1.0";
var Sol_key;
var Data;
List weather_data = [];
//now we will create the function for the HTTP request
Future<String> getData() async{
http.Response response = await http.get(
Uri.encodeFull(Url),
headers: {
"Accept" : "application/json"
}
);
setState(() {
Data = json.decode(response.body);
print(Data);
Sol_key = Data["sol_keys"]; // make sure to read the full documentation :p
Sol_key = Sol_key.reversed.toList();
for(int i = 0; i< Sol_key.length; i++){
weather_data.add(Data[Sol_key[i]]["AT"]); // this will allow us to get only the weather data
}
print(weather_data);
});
//Okey now we've done with our http request let's now implement the data to our UI
}
//let's call our function
@override
void initState() {
// TODO: implement initState
this.getData();
}
@override
Widget build(BuildContext context) {
return Scaffold(
body: Container(
//first let's add the background image to our project
width: double.infinity,
decoration: BoxDecoration(
image: DecorationImage(
image: AssetImage("Assets/bg.png"),
fit: BoxFit.cover,
alignment: Alignment.center,
//now let's add a black color filter to make the text more visible
colorFilter: ColorFilter.mode(Colors.black54, BlendMode.darken),
),
),
child: Padding(
padding: EdgeInsets.only(top: 50, bottom: 15, left: 15,right: 15),
child: Column(
mainAxisAlignment: MainAxisAlignment.start,
crossAxisAlignment: CrossAxisAlignment.start,
children: <Widget>[
Text(
"Latest Weather\nat Elysium Planitia",
style: TextStyle(
color: Colors.white,
fontWeight: FontWeight.w800,
fontSize: 28.0
),
),
SizedBox(height: 30.0,),
//Now let's create the data container
Row(
children: <Widget>[
Expanded(
child: Text(
"Sol ${Sol_key[0]}",
style: TextStyle(
color: Colors.white,
fontSize: 38.0,
fontWeight: FontWeight.bold,
),
),
),
Expanded(
child: Text(
"High: ${(weather_data[0]["mx"]).ceil()}°C",
style: TextStyle(
color: Colors.white,
fontSize: 34.0,
fontWeight: FontWeight.w300,
),
),
),
],
),
SizedBox(height: 10.0,),
Row(
children: <Widget>[
Expanded(
child: Text(
"Today ",
style: TextStyle(
color: Colors.white,
fontSize: 38.0,
fontWeight: FontWeight.bold,
),
),
),
Expanded(
child: Text(
"Low: ${(weather_data[0]["mn"]).ceil()}°C",
style: TextStyle(
color: Colors.white,
fontSize: 34.0,
fontWeight: FontWeight.w300,
),
),
),
],
),
//Now we will create the list for the previous days' data
SizedBox(height: 60.0,),
Text(
"Previous Days",
style: TextStyle(
color: Colors.white,
fontWeight: FontWeight.w800,
fontSize: 28.0,
),
),
SizedBox(height: 10.0,),
Container(
height: 3.0,
width: double.infinity,
color: Colors.white,
),
Expanded(
child: ListView.builder(
itemCount: Sol_key.length,
itemBuilder: (BuildContext, int index){
return ListItem(Sol_key[index], (weather_data[index]["mn"]).ceil(), (weather_data[index]["mx"]).ceil());
}
),
)
],
),
),
),
);
}
}
Make a Mars Weather App in Flutter Using NASA API
 Reviewed by Medics
on
August 06, 2020
Rating:
 Reviewed by Medics
on
August 06, 2020
Rating:


I got this error : '[]'
ReplyDeleteDynamic call of null.
Receiver: null
Arguments: ["mx"]
How Can I fix it?
please keep making these posts this is awesome
ReplyDelete